/ua-templates/version3/images/swbanner/swlogo-hz.png)

How to Create a Form
Creating a form on the new page
Step 1
![]()
In edit mode, click on the icon
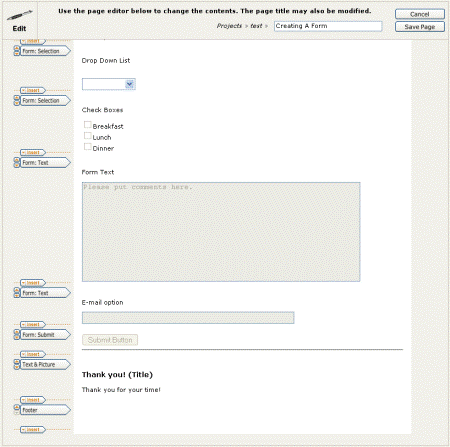
Step 2
Creating the form - after clicking on the edit icon, a page similar to this will show.
![]()
Step 3
Click on the Insert arrow button that points to the space where a form component is to be added. Then choose the type of component to be inserted.
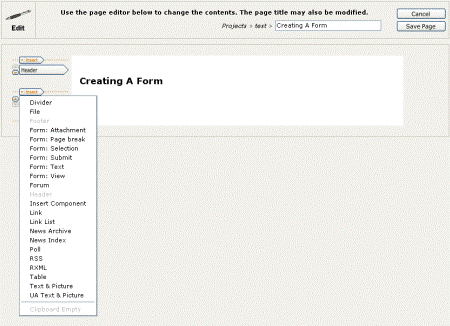
Types of form components
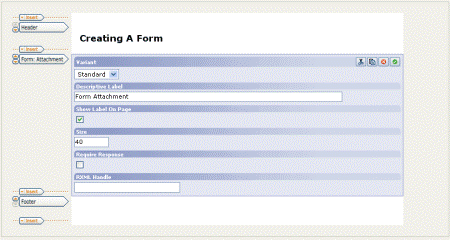
Form: Attachment
Form: Page break
Insert a form page break if it is desirable to have the form information displayed on multiple pages. Above the page break will be on one page and below the page break will be another page. If the Show Previous check-box is clicked, a previous button will show up on the second page.
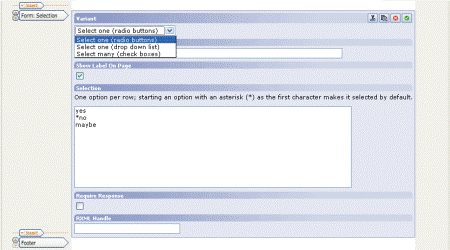
Form: Selection
The Form: Selection component has three variants. Choose radio buttons, drop down list or check boxes. A label can be added. To make this field mandatory, click the Require Response check box. Type the available options in the Selection text area, one option to one line. If one of the entries needs to be selected by default precede the option with an asterisk (*).
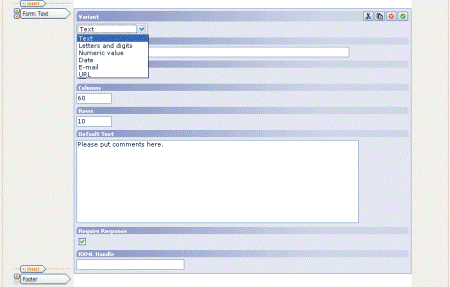
Form: Text
Once a Form: text component has been entered, be sure to fill out the label. There are six variants of the Form:
| Text component | |
| Text | It is just that, a text box. |
| Letters and digits | This is a text box that is one line, instead of multiple lines like a text box. |
| Numeric value | This variant will only allow numbers to be added in the text line. If they enter non-numeric information, when the user clicks on the Submit button they will receive a * Please submit a valid value for the field above. Only a numeric value is allowed. error. |
| Date | This is a text line which will be followed by a "SET DATA" button. This button will bring up a calendar for the user to choose a date from. If the user chooses to type in a date and does not enter the date in a YYYY-MM-DD format they get an error: * Please submit a valid value for the field above. Date format is YYYY-MM-DD. |
| This type checks for the proper format of an email address and will also error out if entered incorrectly. | |
| URL | This expects a properly formedURL, including http://. If default text is desired, it can be entered into the default text box. |
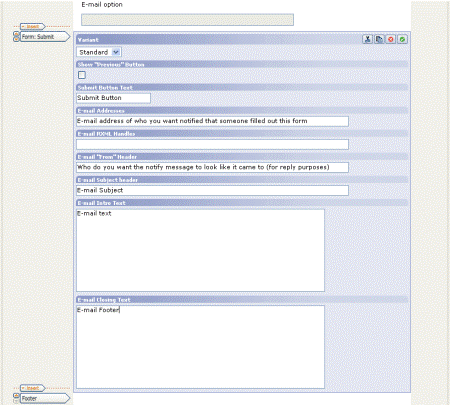
Form: Submit
To finish a form, add a submit component. To customize what the Submit button says, put it in the Submit Button Text area. To have an e-mail sent every time someone submits a information in the form, fill in the E-mail Address test area. Leave E-mail RXML Handles text field empty. To set the from e-mail address and subject of the e-mail that will be sent every time a form is submitted can be set in the E-mail "From" Header and the Email Subject header text areas. This e-mail contains the information submitted in the form and additional text entered in the components E-mail Subject, E-mail Intro Text and E-mail Closing Text areas.
Thank you page
Note
Divider
Do not use the Divider component in a form. If a divider is added to a form: 1. The page will not look different (the divider does nothing on a form page) 2. When a person fills out the form a database entry (and if the email option was set, a corresponding email will be sent) for each section. There are two for each divider (one before and one after the divider). For example, if a single divider was inserted on a form page, for every person submitting the form, there would be two records added to the database.
To return to the Using Forms Index click here.
/ua-templates/version3/images/swLogo.gif)